Producing and editing a story
Remember, your story matters! So it is important to be careful and attentive to the practical side of producing and editing your story. Reach out and ask for help from other participants or the facilitators if you feel stuck.
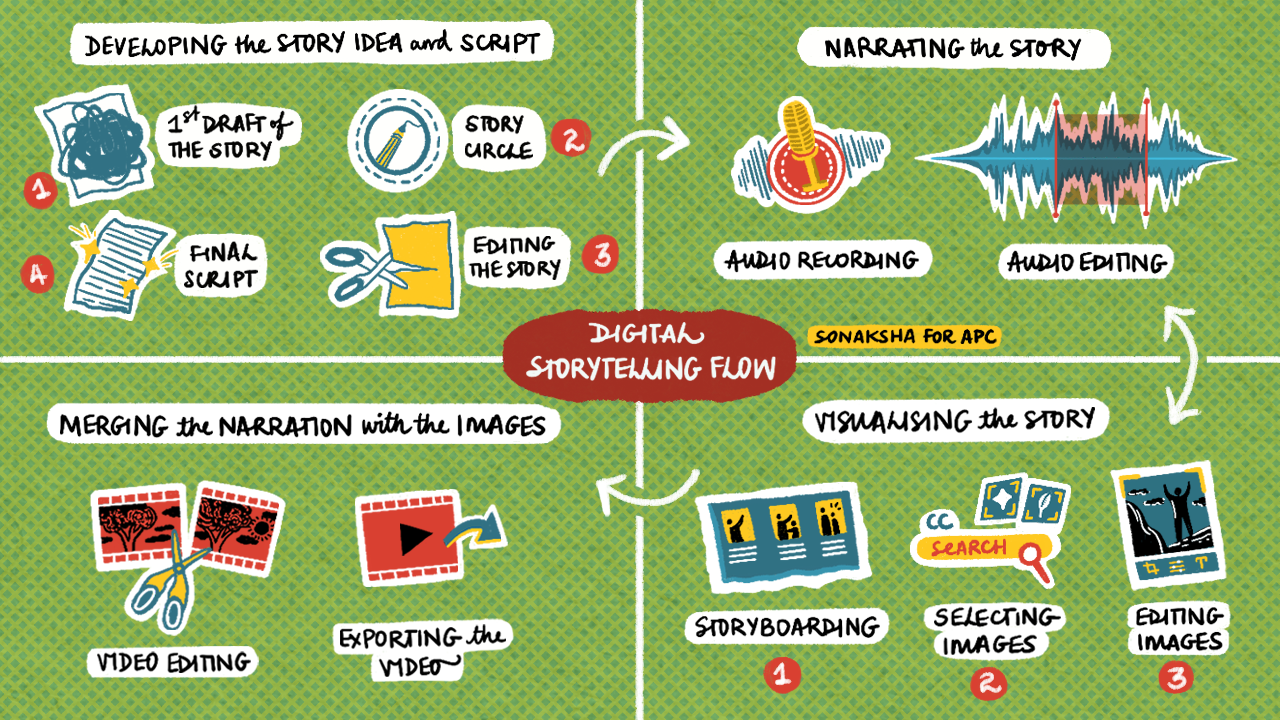
Here are the basic elements of the flow of creating a digital story. You first need to decide what form you want your story to be in. This could be a digital story, a podcast, an Instagram story, a digital collage, an e-zine etc.
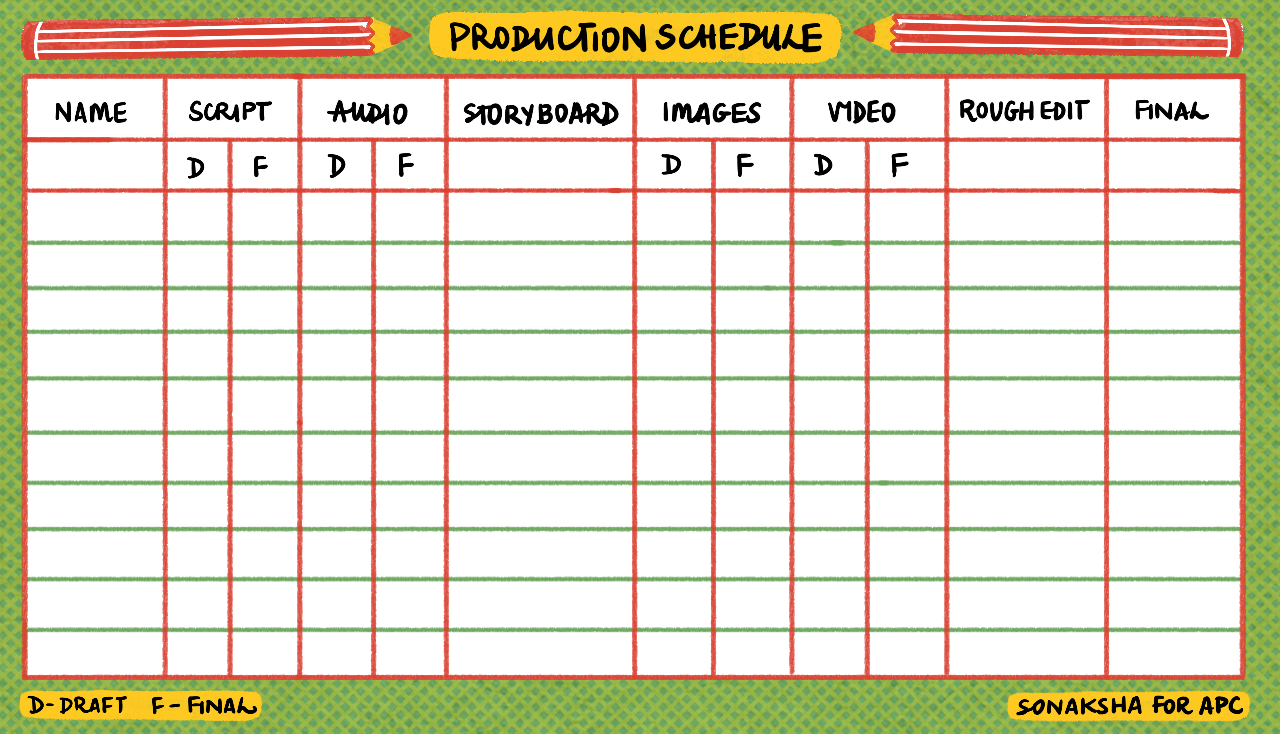
There are many stages of producing and editing a story. For the facilitators to keep track of how participants are doing in the various stages, we recommend that you set up a Production Schedule. This lists names of participants and all the tasks needed to produce a final story. As the participants complete a task, they are reminded to tick on the Production Schedule what they have completed.
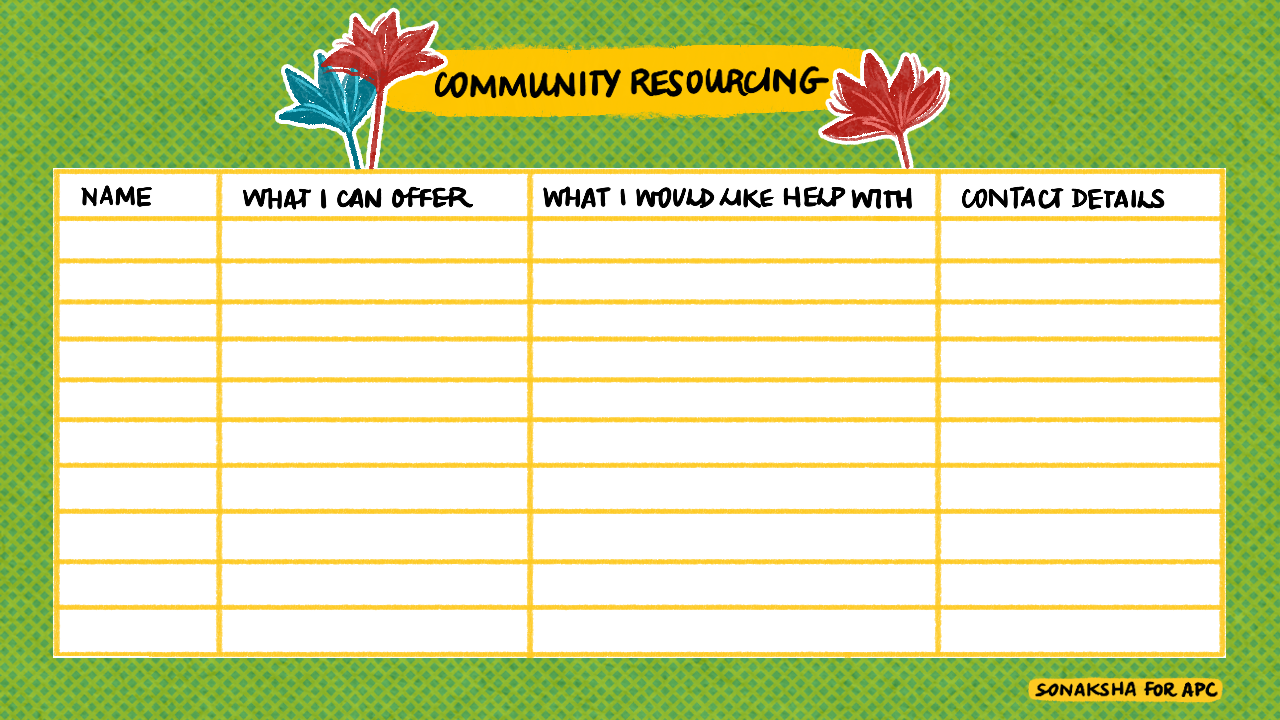
Before you start the workshop, it is a good idea to crowdsource the skills that exist amongst the participants. This means that participants can assist each other and make the learning experience an exchange of skills. Perhaps someone is good at drawing, another is confident with recording audio etc. Use this Community resourcing tool.
Stages of producing and editing your story
We highly recommend that you get organised before you start your story! Set up a folder on your laptop or mobile phone which has a logic to it that will help you when you are ready to put together the elements of your story. Give it a name such as MyStory and then have sub-folders for the script, the images, the audio and the final story. In each sub-folder, have a draft and a final sub-folder. Your Final Story should have a folder which is called Final Story and Video editing project.
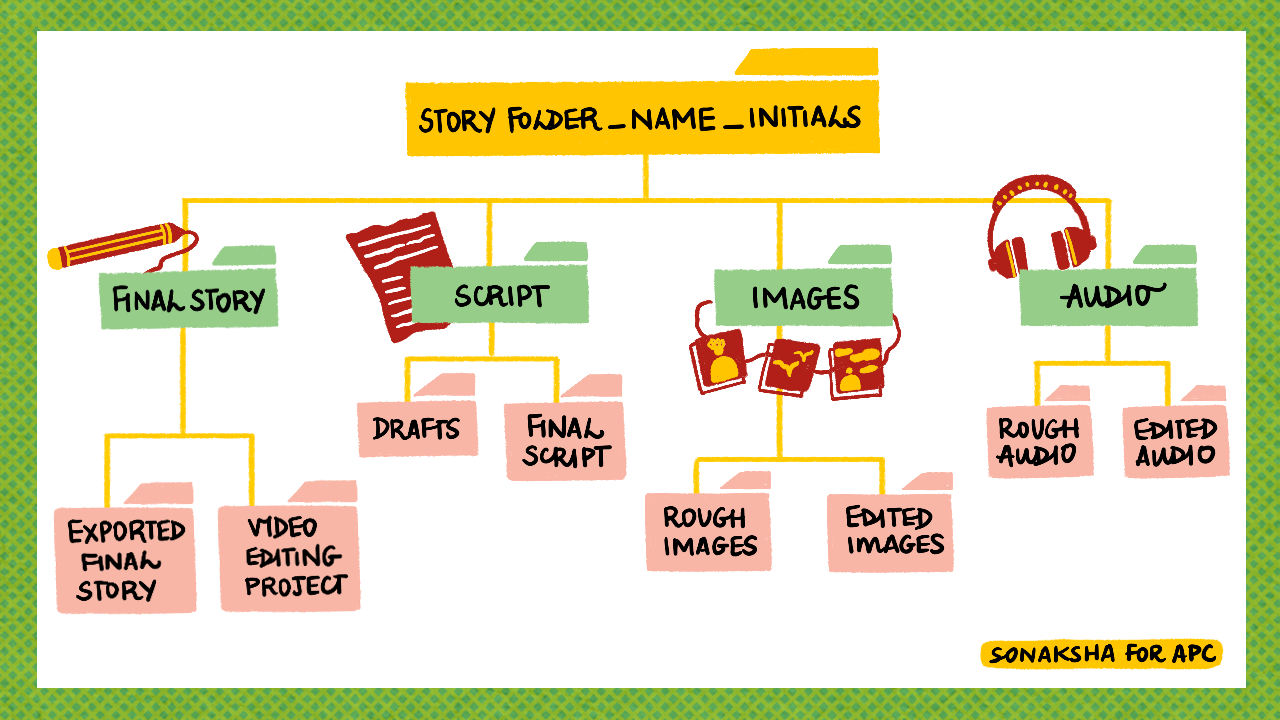
This way you keep all your elements in case you want to re-visit your story and edit and change it.
You need a script, which is your story. We recommend a script of no longer than 500 words. This usually means your story will be about 3-5 minutes long which is a good length. See section on Form of a story for how the development of a script happens. Here you can read some tips and advice on developing your script.
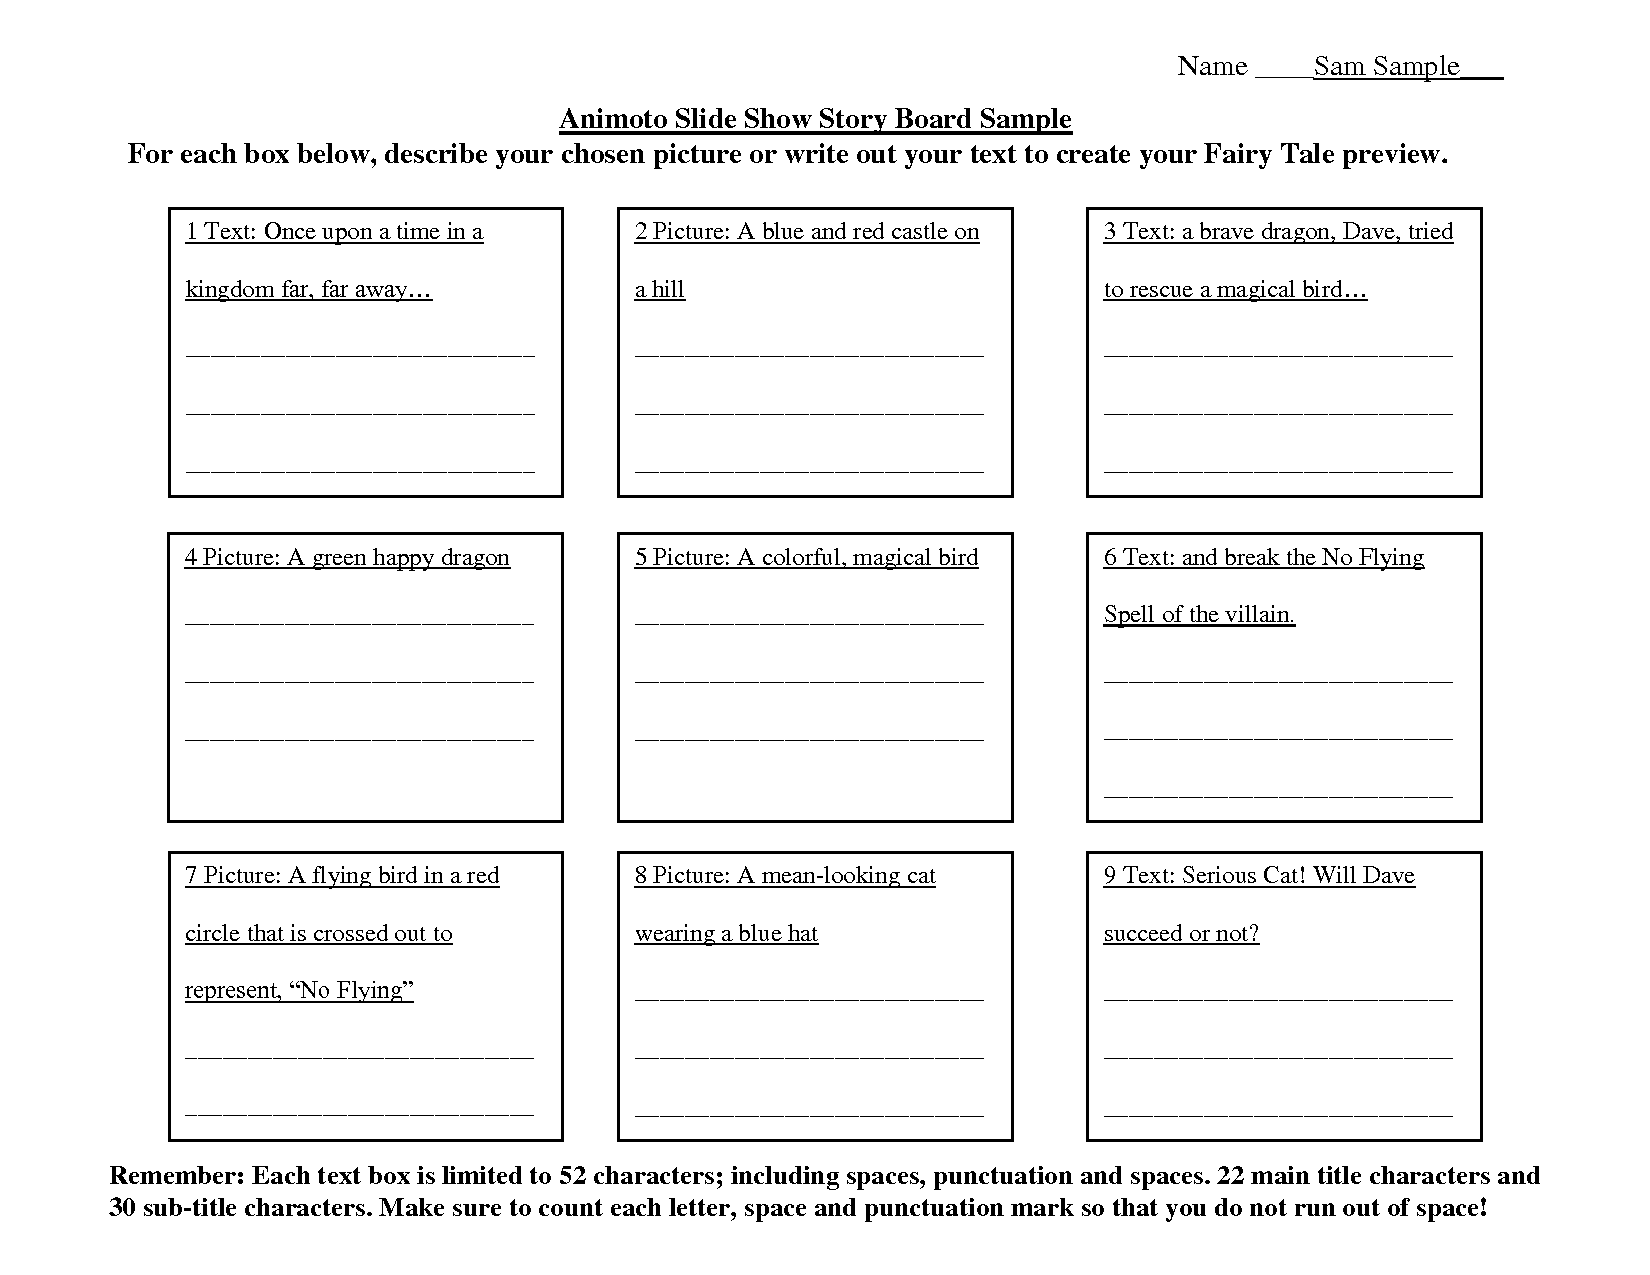
The next step is a Storyboard which will assist you in knowing what visual elements you need for your story. If you are using only audio, this can still assist in breaking down the story into smaller pieces to see what is core, what lines of audio can be repeated etc. For a podcast, it is a good idea to select or draw one image that represents the core of the story and can be used for uploading to the internet.

Here is a storyboarding template to adapt and use.
To record your audio, you can use your mobile phone or any good audio recorder. Make sure that you are in a quiet space and that you won’t have any interruptions. Often it helps to have another participant with you to hold equipment and give you feedback on your recording. If you have your script on a piece of paper, remember to place that on a surface so that you don’t record turning or rusteling paper. Test your voice, test the settings and listen back for any external noises and the level of your voice. It makes a big difference to a story if the voice is clear, that you don’t rush over words and not have background noise.
We suggest that you use Audacity to edit your story. You can download Audacity for free here. https://www.audacityteam.org/ Audacity is free, open source, cross platform audio software. We like Free and Open Source! Read about the importance of Open Source at the Feminist Principles of the internet - https://feministinternet.org/en/principle/open-source

Use these supporting documents to help you with Audacity.
Another free and open source software we recommend to assist you with editing your images is GIMP. You can download it for free here https://www.gimp.org/
Here are some supporting documents to help you with GIMP.
Remember to read the section of this manual on Creative commons licensing, distribution and attribution if you are Creative commons licensing, distribution and attributiongoing to find images off the internet.
Putting your story together
If you have chosen to make a digital story, you will need software to help you put all the elements of your story together. The audio, the images and the transitions. There are quite a few softwares and tools out there to use. You can always search the internet to find one that suits you. We would suggest using for laptops and for mobile phones. But find what suits you.
We’ve liked Shotcut - https://www.shotcut.org/ which is a free, open source, cross-platform video editor. This works well for laptops.
There are many for mobile phones, such as Filmora - https://filmora.wondershare.com/
Enjoy making your story!
No Comments